 |
“Everything
could be transferred to the classroom.”
“The instruments were very unique.” |
Harlem
Consolidated Schools, District 122
Loves Park, IL
Interdisciplinary Teacher Workshop/ In-service- 2000 |
|
|

|
|
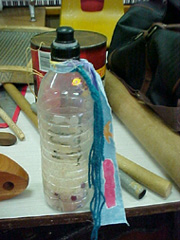
| Shakers
(various cultures) |
Materials
1)
clean, dry, empty plastic water bottles with caps (one per
participant)
2)
natural raw (not instant) rice (one- two cups per participant)
3)
raw corn or beans (one spoonful per participant, not much)
4)
boxes, pans with high sides or plastic washtubs to work in
(rice goes in the tub, rice is poured into the bottle in the
tub) (one tub per 4-5 participants).
5)
decorating materials (any or all of these): cool stickers,
paint markers (regular markers will not work) colored string
and/or long pieces of yarn.
|
 |
|
Steps
1) Select
rice and some of the other grains or vegetables and poor various
proportions into bottle. Use washtub or box to catch extra.
Tips
a) Too little inside the bottle will sound weak and shallow
and not have momentum to play. Too much will not allow for
movement within bottle. Approximately 1/2 to 1 cup of material
inside bottle should be fine.
b) Different material in the bottle sounds different. For
example: All rice is generally a warm sound but not percussive.
All corn or beans is loud and bright.
2) Put cap on bottle.
3) Tape shut (optional).
Decorate
1) Use stickers
or something that will stick to the plastic (not markers).
Play
1) Practice spinning
the materials inside the bottle by holding the bottle horizontally.
2) Practice “slapping” the materials inside the
bottle from side to side for a definite beat.
3) Keep steady time with interesting syncopation.
top...
|
|
Metal
Shakers
These
are very cool because you can easily paint the outside with
a variety of paints. Everything is the same as the shakers
above except you'll need a safe and creative way to close
up the shakers. Here is what I do. Keep the top (watch out,
sharp edges!) and use duct tape or metal furnace tape to put
the tops back on.
|
|
Cuica
(South
American)
These are the easiest
and fastest to make. Every child can make one of these.
Materials
1) Large plastic
disposable plastic cups, large cottage cheese or yogurt containers.
2) Waxed dental floss (about 3 feet per container/instrument).
3) Small piece of sponge (about a cubic inch, this may not
be needed).
4) Poker (nail or compass point or a corkscrew which is relatively
safe).
Steps
1) Poke two small
holes about 1/2 inch apart from each other on bottom of container
or cup. Make sure to try it first so the cup does not collapse
under force.
2) Double up dental floss so total length is about 1 1/2 feet.
3) Thread floss through holes keeping the floss doubled up.
4) Tie floss to cup so length hangs through cup (a slip knot
works best).
Play
1) Place hand in
cup and pull on floss letting it slip through your fingers.
Hold on not too tight and not too loose to produce sound.
a) You may prefer to use a wet sponge instead of your fingers
against the floss.
You can decorate
the sides of the cup but not the bottom. For your information,
they sound they make is like a chicken, turkey, whale or seal.
Are the students studying these animals?
top...
|
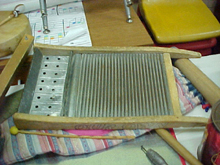
Washboard
"Strum"
like a guitar with an even up and down motion but
not always touching the instrument with the scrapers. See
scraper idea in "tips" below (made from shish
kabob sticks). |
| Guiro
(South American)
Materials
1) Empty
“ribbed” plastic water bottle.
2) Wooden spoon, pencil, comb and/or shish kabob sticks.
Steps
1) Take
cap off bottle.
Play
1) Drag
or scrape the pencil, spoon or comb across the ribs.
|
 |
2)
Play long and short sounds.
Tips: I use about 10 shish kabob sticks taped together in a
cluster for a scraper. Also, there are plastic bubble bath bottle
that have ribs on them.
(Image above is made for a gourd) |
|
Dulcimers
(American)
Contact Backyard
Music
Dave and Nancy
Cross
backyard@ct2.nai.net
PO Box9047
New Haven CT 06532
203. 281. 4515
The library the
retail rate of $36 each for the kits
plus about $9 for shipping.
Retail prices are $45 for 1-3, $36 for 4-11, and $30 each
for 12 or more
kits.
Contact: information@jimkanas.com
for instructions on assembly.
top...
|
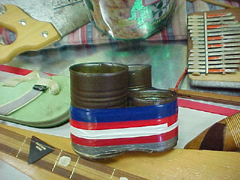 |
Steel
Drums (Caribbean)
Materials
1) 3
different size tin cans per drum set
2)
Masking or other strong tape
3)
Drum sticks- ideally 3/8 or 1/2 inch dowel rods about 8 inches
long or jumbo pencils.
|
|
If
you want to decorate the drums before assembly, use clear
packaging tape to hold them together.
Steps
Tin cans should
be open, clean and free of burrs. Place the cans open side
up on a flat surface. Tape the cans together. Decorate before
or after assembly.
Tip:
Some small cans have stiff bottoms and do not resonate, experiment
before assembly. You can actually tune the drums by bending
the bottom of the cans from the underneath using a stick or
tool. Place the stick through the can and firmly push up until
the bottom of the can rises and forms a little bump on the
bottom. This lowers the pitch!
top...
|
| Panpipes
(South American)
Materials
1) Small
half inch PVC pipe (the yellow/ beige type) (approximately
30 inches per participant)
2) Modeling clay (not "play dough") (about 5 large
marble size balls per participant, not much)
3) Masking tape (about one roll for every 10 students)
4) Optional: magic markers, clear packaging tape and/or colored
string.
5) 5 jumbo pencils or 1/2 inch dowel rods (5 rod at about
6-8 inches each)
6) Ruler
7) Pipe cutters*
* Manual
“C-Clamp Type” pipe cutters are safe but take
time to use.
Steps
1) Cut 5 pieces of pipe for each student. The lengths are:
6”,5 1/2”, 5”, 4 1/2” and 4”.
2) Wash pipes
3) Tape two longest pipes together with masking tape, smooth
ends should be flush.
4) Tape two the shortest pipes together (as in step #3).
(see illustration)
5) Tape middle size pipe (5 inch) to long pipe group against
second longest pipe(5 1/2 inch pipe) with smooth ends flush.
6) Tape both groups of pipes together so they descend in size.
7) Stuff and plug.the bottom of each pipe with a large marble
size chunk of modeling clay. The "bottom" of the
pan pipe are the edges that are not flush with each other.
This is the end that the plugs go into.
Tune
Play
and tune one pipe to a minor pentatonic scale or any group
of five notes.
Blow into each pipe like a flute or pop bottle to produce
the pitch. Move the plugs up and down to raise or lower the
pitch of each pipe by pushing the plugs with a dowel rod.
Once one pan pipe is in tune by the group leader/ teacher
(this needs to be done ahead of time), templates can be made
so that the students can tune their pan pipes.
To make
tuning rod template
1) Gather
1/2 inch dowels or jumbo pencils with flat end. Each dowel
rod should be about 8 or 10 inches long. One tuning rod template
per every 3-5 student should be enough.
2) Place one dowel rod in each pipe of the tuned pan pipe
and mark the depth and number of each pipe (the pipe should
be numbered 1-5 with number one being the biggest or lowest
pipe)
3) You should now have one dowel rod with 5 markings on it,
one for each length of pipe (derived from the tuned pan pipe).
4) Double check tuning rod measurements.
5) Copy the markings on each dowel rod.
6) The students tune their instruments with the dowel rods
by moving the plugs up and down till the tuning rods are the
correct depth up to the respective markings
Play
Blow
into the pipes like an orchestral flute of pop bottle. Create
patterns and improvisations based on rhythms.
|
 |
"Boom
Pipe"
Play
by striking either end with a flexible rubber sandal.
|
|
|